ELIANE Scrub Top // Tips, Tricks
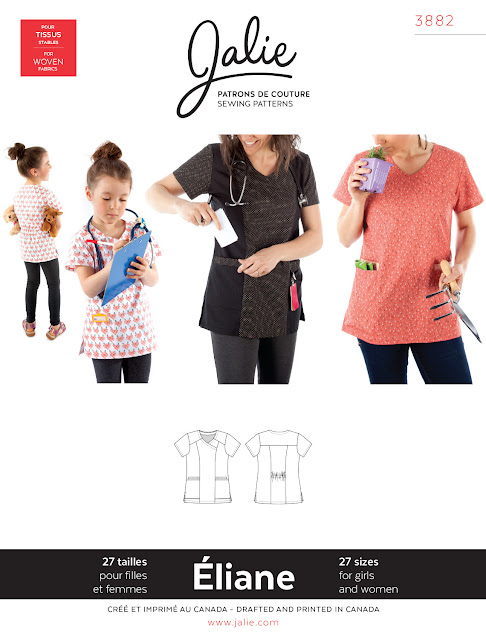
During this crisis where healthcare workers are holding the fort and working hard to keep everyone safe, we thought of highlighting a pattern designed especially for them: the Eliane scrub top pattern.
** For the francophiles out there: How to pronounce Éliane (the nurse who inspired the pattern)**
If you know someone who needs to wear scrubs for work, now is the perfect moment to spend time making a scrub top for them!
We also put together this tutorial to walk you through all the steps. This way, even people with little sewing experience will be able to make a scrub top!
Our scrub top pattern was designed in collaboration with nurses to ensure that it would be practical but also flattering. The princess seaming, facings, and pockets allow you to have fun with color blocking but also use fabric you have left in your stash.
This post will not cover detailed information about sizing or fabric. We will focus on more "critical" ones or areas where you could hesitate or scratch your head. It is not a difficult pattern, but because of the number of pieces, you do need to you take your time and pay attention.
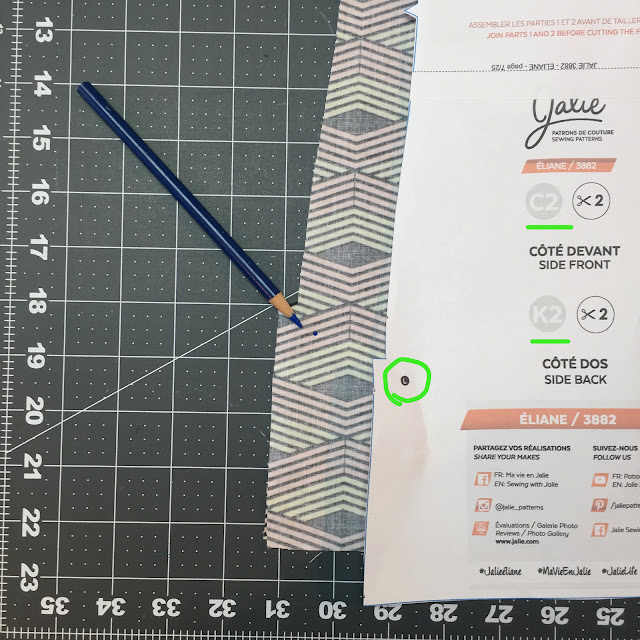
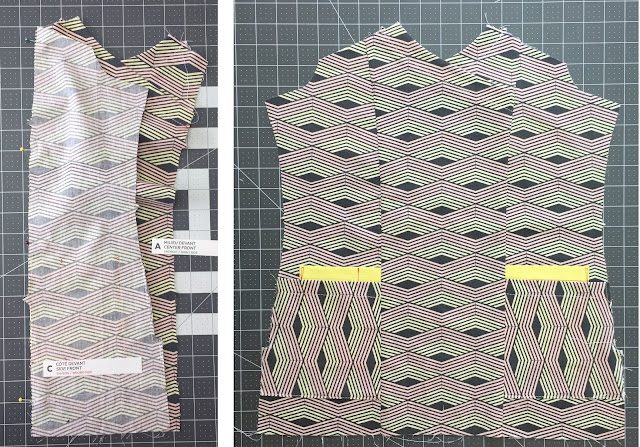
In the Eliane pattern, piece C and K (side front and side back) share the same bottom section (part 2). You simply have to tape the top parts (C1 and K1) to the C2/K2 piece. You only have to flip the top part when you cut your fabric, like this:
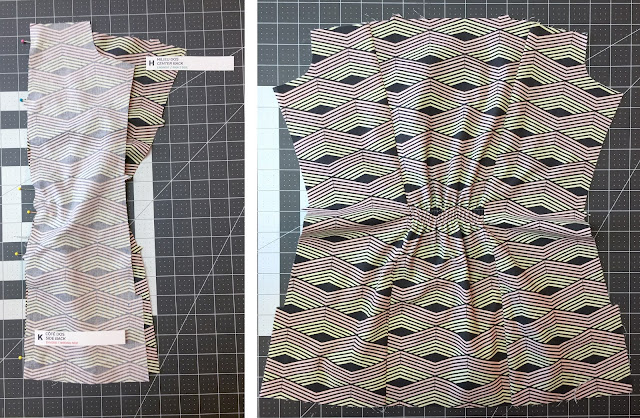
For example, when looking at the back pieces, you can see the yoke, side, and center. Each has notches and you will have the center back mark to help you align the yoke and center panel together.
Notice how the notches are carefully cut. They are very important in the Eliane pattern. Cut them correctly (triangles and trapeze shapes). Sew along the curved edges without notches with a serger or use a zigzag for a cleaner finish:
Pin the elastic (the length you should cut is listed in a chart on the pattern) at the line (below it). Start by pinning the ends of the elastic and stitch across the ends, close to the edges to hold them in place. Then, stretch out the elastic and add pins to keep it straight along the line. By doing this, the next step will be much easier!
Stich along the edges of the elastic, using a long straight stitch. You are now ready to sew the side pieces to the center panel.
Pin the side back pieces to the center back piece, matching the notches. Sew with a straight stitch, 1 cm (3/8'') from edge. For a clean finish, you can serge along the edge or use a zigzag to mimic an overclock seam without the fancy machine ;) The lower back is assembled, ready to the yoke.
Press the seam allowances towards the sides. Pin the yoke to the lower back, matching notches and center back marks (fold lines). Stitch from one armhole to the other and press the seam allowance towards the yoke.
Pin the back facing to the back neckline, matching notches and centers and stitch.
Trim the seam allowance (optional) and clip the curves. Press the facing away from the garment and understitch.
Understitching is stitching close to the edge of a facing to keep it from rolling out. You stitch through the facing and the seam allowance. Pulling fabric away from the seam to keep it nice and flat will help have a perfect understitching. Follow the seam line, stitching 2-3 mm (1/16"-1/8") from it.
After the facing is understitched, you bring it back in place, interfaced side against the wrong side of the main fabric.
There is an extra step for the front inset before you attach it to the front. You need to topstitch it 2 cm (3/4'') from edge. Then, pin it to the center front piece, matching the notches. Pin and stitch 6 mm (1/4'') from edge for this piece only.
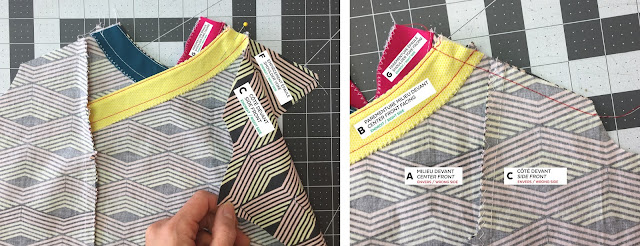
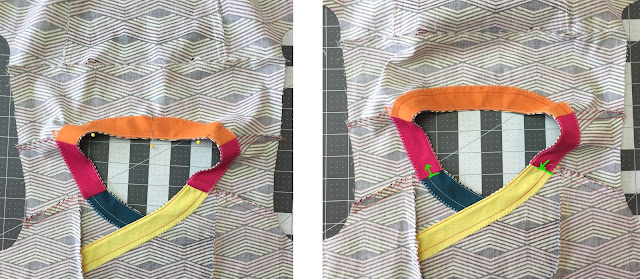
Now, pin the center front facing over the neckline edge (sandwiching the inset), matching the notches, and stitch 1 cm (3/8''), the usual seam allowance for this pattern, trim, understitch and topstitch:
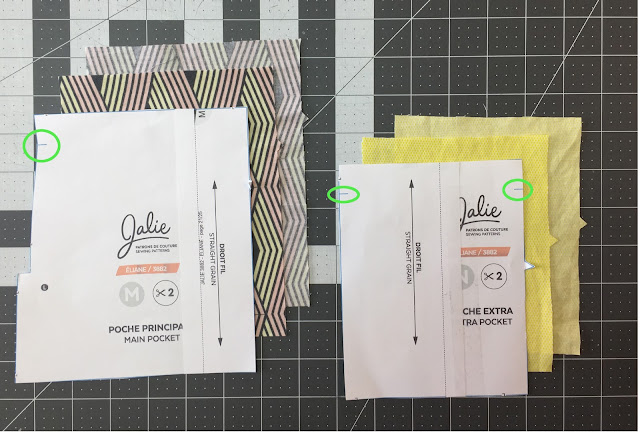
Fold the top at the mark (2 cm (3/4'')), press and topstitch. Fold the raw edges without notches by 1 cm (3/8'') to wrong side and press. Repeat for the other extra pocket.
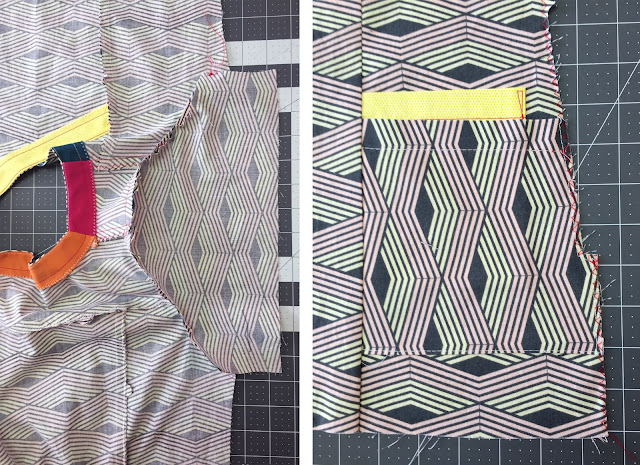
Pin wrong side of extra pocket to right side of side of side front and topstitch along the folded edges as shown in the photo. Add topstitching 4 cm (1 1/2'') from edge to create a section for a pencil.
Fold and topstitch the top of the main pocket, press the bottom seam allowance to the wrong side of the pocket. Then pin the main pocket on top of the extra pocket and topstitch as shown:
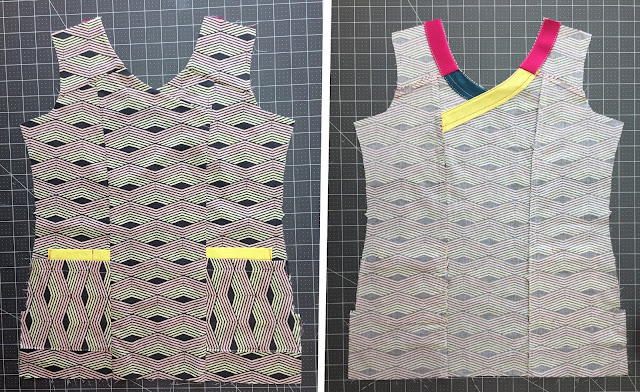
The side panels are now ready to be attached to the center front. Pin, matching notches and stitch. Press seam allowances towards center front:
Sew facings to shoulder yokes using the same technique as earlier but DO NOT TOPSTITCH.
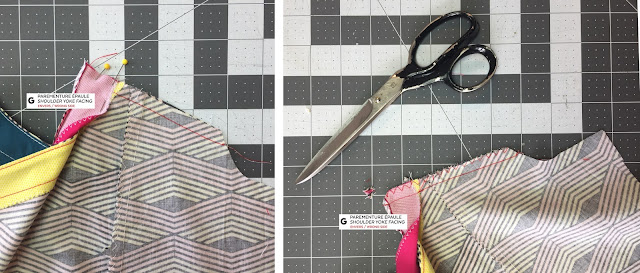
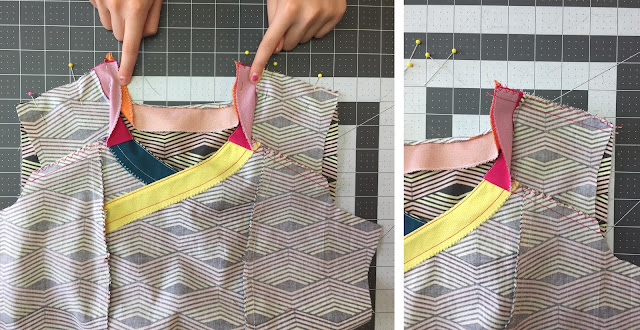
Leave the facings as shown on the photo on the right. Pin the front of the scrub to the yokes, the neckline seams aligned. Stitch as shown and make sure you do NOT catch the shoulder yoke facing in the seam.
Bring shoulder yoke upwards and then bring the shoulder yoke facing (red) against the center front facing (yellow), right sides together, and stitch. At the same time, finish the raw edge of the seam with a zigzag (or serger). Clip the corner and turn right side out.
Bring facing and garment wrong sides together, pin the facings and topstitch shoulder yokes and back facing in one, continuous seam:
Now, sew the sleeves in (easy, no special technique here - just make sure the center of the sleeve is aligned with the shoulder seam) and prepare your side seams edges (one piece at a time) before the next step by finishing the edges with a zigzag. If you are using a serger, stop just above the side slit edge.
After the side seam edges are finished, pin the side seam edges right sides together and stitch, from sleeve hem corner to the mark at the top of the slit section (that you marked at the beginning).
Press the seam allowance open and topstitch each side, turn the wider section under (or leave it flat if you prefer a wider topstitching), press and topstitch as shown.
All that is left is hemming the bottom edge and sleeves! Finish the edges first, then fold to wrong side, press and topstitch!
We hope this step-by-step tutorial will help. We can't wait to see the Eliane scrubs your make for yourself or people you know. Make sure you use the coupon code to get 25% off the PDF pattern before April 20, 2020!
Please note that the PDF pattern also includes a file edited especially for projectors. To learn more about projectors for sewing, visit the Projectors for Sewing group on Facebook. You will find plenty of information on this new technology that is making its way into many sewing rooms.
Stay healthy, stay safe.
** For the francophiles out there: How to pronounce Éliane (the nurse who inspired the pattern)**
If you know someone who needs to wear scrubs for work, now is the perfect moment to spend time making a scrub top for them!
This weekend only (March 28-29, 2020)
NO COUPON NEEDED // How way to help and say thanks :)
 |
|
|
Our scrub top pattern was designed in collaboration with nurses to ensure that it would be practical but also flattering. The princess seaming, facings, and pockets allow you to have fun with color blocking but also use fabric you have left in your stash.
This post will not cover detailed information about sizing or fabric. We will focus on more "critical" ones or areas where you could hesitate or scratch your head. It is not a difficult pattern, but because of the number of pieces, you do need to you take your time and pay attention.
PUZZLE PIECES
If you have been sewing with Jalie patterns for a while, you might have noticed "puzzle pieces" in some of our patterns. These are designed to not only save space on our pattern sheets but also to save tracing/printing paper for you too!In the Eliane pattern, piece C and K (side front and side back) share the same bottom section (part 2). You simply have to tape the top parts (C1 and K1) to the C2/K2 piece. You only have to flip the top part when you cut your fabric, like this:
SIDE SEAM MARK
Before you start sewing, you must transfer the mark (black dot) you see on the pattern, near the side slit section on pieces C and K (2x each). The mark indicates where the side seam ends / where the side slit starts:VISUALIZE THE FINISHED GARMENT
Throughout your project, it's always good to lay the pieces as they will be in the end. It helps you get a clearer picture of the steps to come and identify the marks that will help you assemble, which we mention in the instructions.For example, when looking at the back pieces, you can see the yoke, side, and center. Each has notches and you will have the center back mark to help you align the yoke and center panel together.
FACINGS
Applying interfacing to the wrong side of your facing pieces will give more body to the neckline. We are using different colors to make this tutorial easy to understand:Notice how the notches are carefully cut. They are very important in the Eliane pattern. Cut them correctly (triangles and trapeze shapes). Sew along the curved edges without notches with a serger or use a zigzag for a cleaner finish:
ASSEMBLING THE BACK
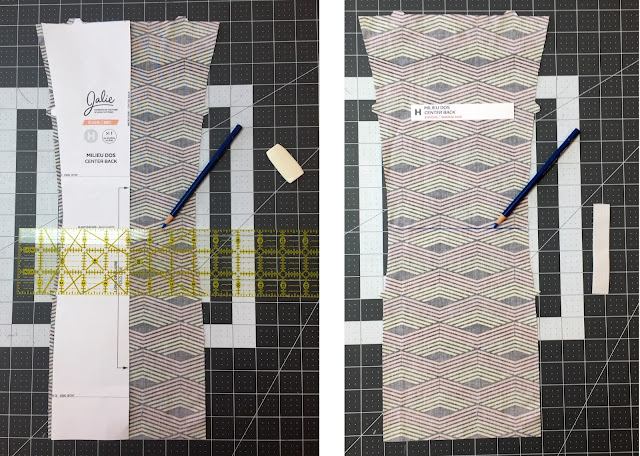
Transfer the back waist elastic line to the WRONG SIDE of the center back piece. It will be your guide when pinning and sewing the elastic.Pin the elastic (the length you should cut is listed in a chart on the pattern) at the line (below it). Start by pinning the ends of the elastic and stitch across the ends, close to the edges to hold them in place. Then, stretch out the elastic and add pins to keep it straight along the line. By doing this, the next step will be much easier!
Stich along the edges of the elastic, using a long straight stitch. You are now ready to sew the side pieces to the center panel.
Pin the side back pieces to the center back piece, matching the notches. Sew with a straight stitch, 1 cm (3/8'') from edge. For a clean finish, you can serge along the edge or use a zigzag to mimic an overclock seam without the fancy machine ;) The lower back is assembled, ready to the yoke.
Press the seam allowances towards the sides. Pin the yoke to the lower back, matching notches and center back marks (fold lines). Stitch from one armhole to the other and press the seam allowance towards the yoke.
Pin the back facing to the back neckline, matching notches and centers and stitch.
Trim the seam allowance (optional) and clip the curves. Press the facing away from the garment and understitch.
Understitching is stitching close to the edge of a facing to keep it from rolling out. You stitch through the facing and the seam allowance. Pulling fabric away from the seam to keep it nice and flat will help have a perfect understitching. Follow the seam line, stitching 2-3 mm (1/16"-1/8") from it.
After the facing is understitched, you bring it back in place, interfaced side against the wrong side of the main fabric.
NECKLINE
Sew facings to the front inset pieces using the same technique:There is an extra step for the front inset before you attach it to the front. You need to topstitch it 2 cm (3/4'') from edge. Then, pin it to the center front piece, matching the notches. Pin and stitch 6 mm (1/4'') from edge for this piece only.
Now, pin the center front facing over the neckline edge (sandwiching the inset), matching the notches, and stitch 1 cm (3/8''), the usual seam allowance for this pattern, trim, understitch and topstitch:
POCKETS AND FRONT ASSEMBLY
This scrub has layered pockets sewn to the side panels. Therefore, you should have two "main pocket" pieces and two "extra pocket" pieces. Make sure all marks are transferred onto the fabric before you continue. Finish the top edge of the pockets with a serger or zigzag before the next steps.Fold the top at the mark (2 cm (3/4'')), press and topstitch. Fold the raw edges without notches by 1 cm (3/8'') to wrong side and press. Repeat for the other extra pocket.
Pin wrong side of extra pocket to right side of side of side front and topstitch along the folded edges as shown in the photo. Add topstitching 4 cm (1 1/2'') from edge to create a section for a pencil.
Fold and topstitch the top of the main pocket, press the bottom seam allowance to the wrong side of the pocket. Then pin the main pocket on top of the extra pocket and topstitch as shown:
The side panels are now ready to be attached to the center front. Pin, matching notches and stitch. Press seam allowances towards center front:
Sew facings to shoulder yokes using the same technique as earlier but DO NOT TOPSTITCH.
Leave the facings as shown on the photo on the right. Pin the front of the scrub to the yokes, the neckline seams aligned. Stitch as shown and make sure you do NOT catch the shoulder yoke facing in the seam.
Bring shoulder yoke upwards and then bring the shoulder yoke facing (red) against the center front facing (yellow), right sides together, and stitch. At the same time, finish the raw edge of the seam with a zigzag (or serger). Clip the corner and turn right side out.
SHOULDERS AND SIDE SEAMS
Bring shoulders yokes to back yokes and facings (front+back) right sides together (you will have to "open" the facings to do it) and stitch.Bring facing and garment wrong sides together, pin the facings and topstitch shoulder yokes and back facing in one, continuous seam:
Now, sew the sleeves in (easy, no special technique here - just make sure the center of the sleeve is aligned with the shoulder seam) and prepare your side seams edges (one piece at a time) before the next step by finishing the edges with a zigzag. If you are using a serger, stop just above the side slit edge.
After the side seam edges are finished, pin the side seam edges right sides together and stitch, from sleeve hem corner to the mark at the top of the slit section (that you marked at the beginning).
Press the seam allowance open and topstitch each side, turn the wider section under (or leave it flat if you prefer a wider topstitching), press and topstitch as shown.
All that is left is hemming the bottom edge and sleeves! Finish the edges first, then fold to wrong side, press and topstitch!
 |
| Normally, we would use facing and thread color that matches the fabrics :) |
Please note that the PDF pattern also includes a file edited especially for projectors. To learn more about projectors for sewing, visit the Projectors for Sewing group on Facebook. You will find plenty of information on this new technology that is making its way into many sewing rooms.
Stay healthy, stay safe.
← 2921 Scarf-collar top // Video tutorial JULIA Underwear Tutorial // How to finish with Foldover Elastic →

