Tie-Side Shorts by Dawn (collaboration en anglais)
Hi guys! It's Dawn, of Two On, Two Off, doin' a little guest blogging over at the Jalie blog. You knew it would happen eventually. I'm just waiting to get my Canadian citizenship so I can move into Jalie headquarters and be even more of a superfan. If they won't let me live there, I will be that creepy woman around the corner that asks for sugar at your door and then peeks around at the inside of your house. I'm sure they will love that . . .
Anyhoo, do you ever need some mind-numbing vegging time? On the computer? With Pinterest? I swear that site has caused several remodeling projects and several garments over the years. My husband has grown leary of my glassy-eyed admiration.
Me: Honey, what do you think about painting our bedroom Whispering Spring?
Honey Bear: Uh-huh.
Me: Ooooh, what about Quiet Moments?
Honey Man: What? Quiet what??
Me: You know, calm blue shades that will help us unwind. Ooooh, how about Beach Glass?
Him: *blink, blink*
Him: Oh crap, are you looking at Pinterest again?
Well this time I was not looking at paint. Instead I was flipping through the Jalie Inspiration photos. Have you seen those? They have inspiration photos and say, “Use Jalie XXXX and add length to make this summer cardigan.” I stumbled upon the Inspiration – Swimwear category and saw a few side gathered swim bottoms (go look, you know you want to). I knew if I added an inch or two of length, I would have a pair of cute running/summer shorts. So, voila, here you are. I wrote a little tutorial and everything. Aren’t you guys lucky?
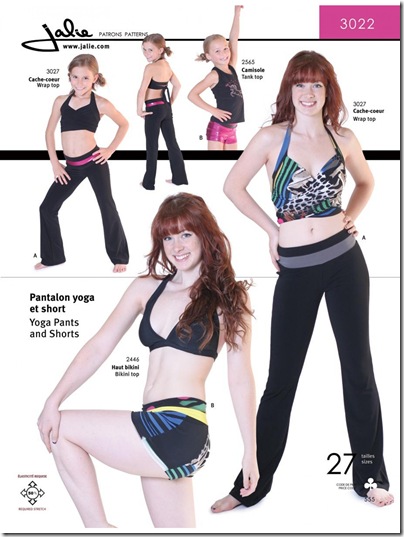
First, you should know what I used for my base pattern. I used Jalie 3022 which is a yoga pants/shorts pattern. The pattern is available in both paper and PDF.
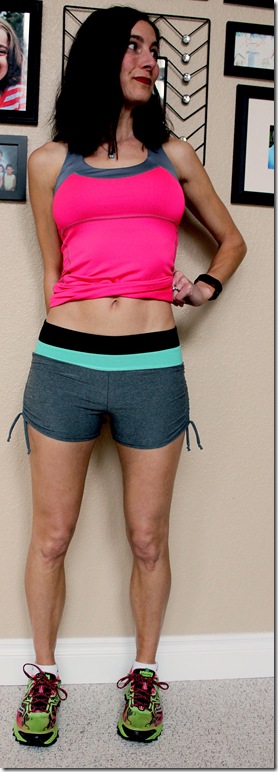
Okay, how cute are these shorts?? And really, they'd be cute even without the side detail.
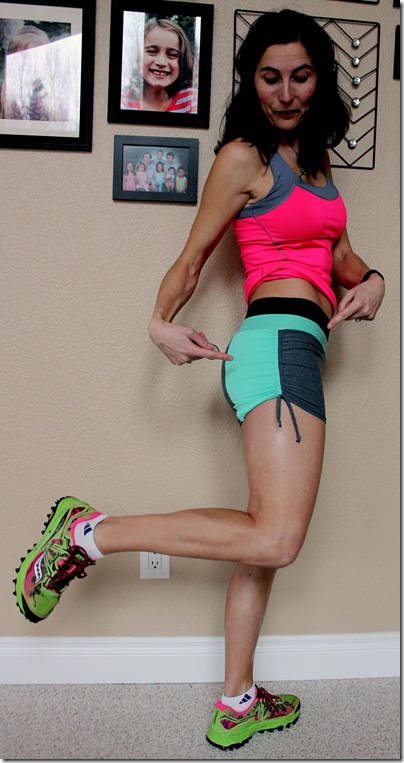
I love the little tie detail on the side!!

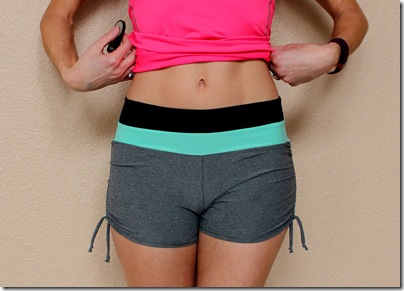

And, as promised a little tutorial for you! Toot! Toot!!

Trace off your normal size for all the pieces, one front, two back pieces, two waistband pieces, and a waistband facing. Once you are done, add an EXTRA 1/2” seam allowance to the SIDE SEAMS of the front and back pieces. Be sure to transfer your notch marks to the new side seams. Don’t do anything to any other seams.
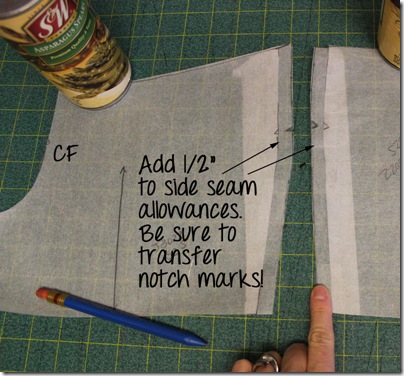

Cut out your fabric and sew the front and back together like this. You will be tempted to go ahead and sew your side seams too, DON’T.

Sew your inseam. I always serge this and do an extra zigzag there just to provide some secondary clothing malfunction safety. Eep! While you are at it, hem your shorts. Your side seams are still not sewn.
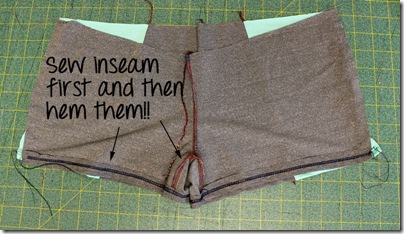

NOW, you can sew your side seams, but DON’T SERGE THEM! REMEMBER you are sewing this at 3/4” seam allowance!!! Your original seam allowance was 1/4” and you added another 1/2” allowance! You want a straight stitch. Yes, I know these are knit. You can either stretch the fabric while you sew (like I did) or use the lightening stitch. You want those seam allowances to lie flat when you are done!

Now, press those seam allowance open and sew them down. This creates a casing for your ties. I go from the inside and make sure my bobbin thread matches the outside. I used gray in the bobbin for my pair.

Here’s your hem.
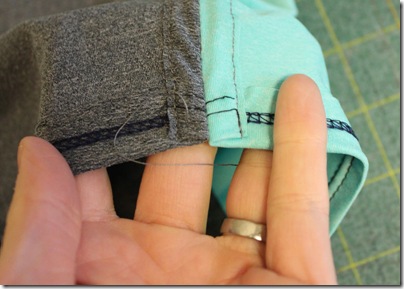
This is what it looks like from the right side.

Make some knit tubes and thread them through your casings.

You want a little extra tube to stick out the top where you will attach it to the waistband.
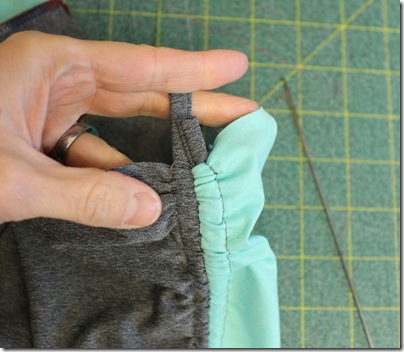
Sew the waistband together and attach it like normal to the top of the shorts. When you sew this at the side seams, this will close the casing and secure the ties in the waistband seam.
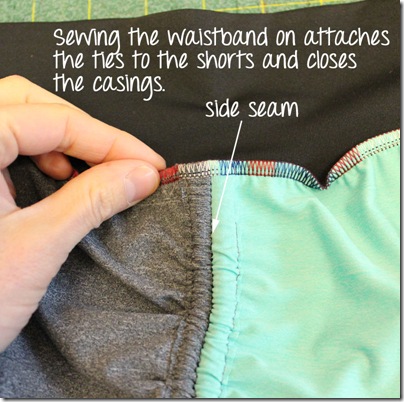
From the inside. Yes, I use varigated thread in my serger loopers. :)

From the outside.

BOOM!

Anyhoo, do you ever need some mind-numbing vegging time? On the computer? With Pinterest? I swear that site has caused several remodeling projects and several garments over the years. My husband has grown leary of my glassy-eyed admiration.
Me: Honey, what do you think about painting our bedroom Whispering Spring?
Honey Bear: Uh-huh.
Me: Ooooh, what about Quiet Moments?
Honey Man: What? Quiet what??
Me: You know, calm blue shades that will help us unwind. Ooooh, how about Beach Glass?
Him: *blink, blink*
Him: Oh crap, are you looking at Pinterest again?
Well this time I was not looking at paint. Instead I was flipping through the Jalie Inspiration photos. Have you seen those? They have inspiration photos and say, “Use Jalie XXXX and add length to make this summer cardigan.” I stumbled upon the Inspiration – Swimwear category and saw a few side gathered swim bottoms (go look, you know you want to). I knew if I added an inch or two of length, I would have a pair of cute running/summer shorts. So, voila, here you are. I wrote a little tutorial and everything. Aren’t you guys lucky?
First, you should know what I used for my base pattern. I used Jalie 3022 which is a yoga pants/shorts pattern. The pattern is available in both paper and PDF.

Okay, how cute are these shorts?? And really, they'd be cute even without the side detail.

I love the little tie detail on the side!!


And, as promised a little tutorial for you! Toot! Toot!!

Trace off your normal size for all the pieces, one front, two back pieces, two waistband pieces, and a waistband facing. Once you are done, add an EXTRA 1/2” seam allowance to the SIDE SEAMS of the front and back pieces. Be sure to transfer your notch marks to the new side seams. Don’t do anything to any other seams.


Cut out your fabric and sew the front and back together like this. You will be tempted to go ahead and sew your side seams too, DON’T.

Sew your inseam. I always serge this and do an extra zigzag there just to provide some secondary clothing malfunction safety. Eep! While you are at it, hem your shorts. Your side seams are still not sewn.


NOW, you can sew your side seams, but DON’T SERGE THEM! REMEMBER you are sewing this at 3/4” seam allowance!!! Your original seam allowance was 1/4” and you added another 1/2” allowance! You want a straight stitch. Yes, I know these are knit. You can either stretch the fabric while you sew (like I did) or use the lightening stitch. You want those seam allowances to lie flat when you are done!

Now, press those seam allowance open and sew them down. This creates a casing for your ties. I go from the inside and make sure my bobbin thread matches the outside. I used gray in the bobbin for my pair.

Here’s your hem.

This is what it looks like from the right side.

Make some knit tubes and thread them through your casings.

You want a little extra tube to stick out the top where you will attach it to the waistband.

Sew the waistband together and attach it like normal to the top of the shorts. When you sew this at the side seams, this will close the casing and secure the ties in the waistband seam.

From the inside. Yes, I use varigated thread in my serger loopers. :)

From the outside.

BOOM!

← Jalie 101 - Que retrouve-t-on dans un patron Jalie? Du nouveau pour le maillot DIANE // Nouvelle pièce gratuite! →


